Introduction to Light Seals and Their Importance in Cameras
Light seals are essential yet often overlooked components in film cameras like the Canon F1. Designed to prevent unwanted light from entering the camera body, they protect your images from damaging light leaks that can ruin shots. Over time, these seals wear out, compromising photo quality and making maintenance necessary. Understanding the right light seal thickness is key to preserving image clarity and maintaining your Canon F1 in top condition. This guide will help you learn everything about light seal thickness, replacement, and care—so you can capture the best possible photos every time.
Understanding Light Seal Thickness in Canon F1 Models:
Light seal thickness plays a critical role in ensuring that your Canon F1 camera functions properly. The thickness determines how well the seal can block out stray light, maintaining the integrity of your images. Each Canon F1 model may have slight variations in the seal thickness required, so it’s essential to understand these nuances before replacement. Too thin a seal may not fully protect against light leaks, while one that’s too thick might interfere with the camera’s mechanisms, making it harder to close the back panel or even damaging sensitive components. Knowing the recommended thickness can save you time and preserve your camera’s life.
Common Issues Caused by Worn-Out Light Seals:
Worn-out light seals lead to various issues, the most common being light leaks. These leaks manifest as streaks or blotches on the film, ruining otherwise perfect shots. Besides light leaks, deteriorated seals may cause tiny dust particles or moisture to enter the camera, leading to film and lens damage over time. Additionally, degraded seals can release sticky residue inside the camera, which may affect the internal mechanisms. Replacing worn-out seals promptly is essential to avoid these issues, which could impact both your images and camera.
Factors That Affect Light Seal Thickness and Durability:
The longevity and effectiveness of light seals depend on several factors:
- Material Quality: Seals made from high-quality foam or felt tend to last longer and are better at blocking light.
- Environmental Conditions: Cameras exposed to humidity, extreme temperatures, or direct sunlight may experience faster seal degradation. Foam tends to dry out in heat, while felt might wear faster in moist conditions.
- Frequency of Use: A camera in frequent use experiences more wear and tear, especially around the film door and battery compartment seals.
- Aging: Over time, even the best materials can break down, losing elasticity and effectiveness. Regular checks can help you spot issues before they affect your photos.
When to Replace Light Seals on a Canon F1:
It’s best to replace light seals as soon as they show signs of wear. Common indicators include visible cracks or crumbling of the foam, sticky residue, or an odd odor coming from the back of the camera. You might also notice unusual light streaks or fogging on your developed film, a strong sign that light is leaking into the camera body. Many photographers recommend checking your seals at least once a year, especially if you use your camera regularly. Keeping a close eye on these signs can prevent costly repairs and ensure your photos remain flawless.
Choosing the Right Light Seal Thickness for Canon F1:
Selecting the correct light seal thickness is crucial for a tight, reliable fit. While Canon F1 models have general guidelines, it’s important to refer to a service manual or consult a specialist for precise specifications. Typically, light seals are available in several thicknesses, and some photographers find that a combination of sizes works best for different sections of the camera. Opt for a thickness that fits snugly but doesn’t impede the camera’s back from closing comfortably. Choosing the right thickness will ensure optimal protection against light leaks and extend the longevity of your Canon F1.
Types of Light Seal Materials and Their Benefits:
There are a few popular light seal materials, each with its advantages:
- Foam: Foam is the most common and provides excellent light-blocking qualities. It’s flexible and easy to install but may degrade faster, especially in heat.
- Felt: Felt is durable, and while it’s slightly less effective at blocking light, it’s a great option for areas with less contact or where foam might wear out quickly.
- Neoprene Rubber: Neoprene offers high durability and is often used in professional-grade cameras. It’s resistant to environmental factors and maintains thickness over time but can be more challenging to install.
Each material provides unique benefits, so the best choice depends on your needs and how frequently you use your camera. Some photographers even mix materials for optimal performance.
How to Measure and Install New Light Seals for Canon F1:
Replacing light seals can be a DIY job if done carefully. Here’s how to do it:
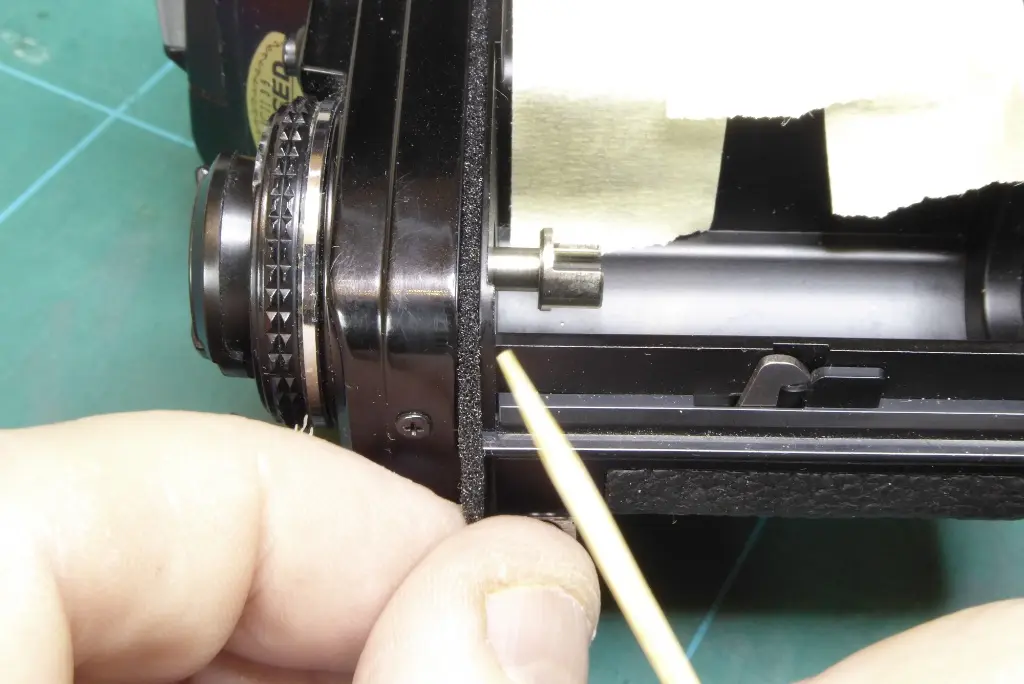
- Measuring the Seal Thickness: Use a caliper to measure the thickness of the existing seal or consult a Canon F1 service manual. You can also find precut kits with the correct thickness.
- Removing Old Seals: Gently scrape off old foam with a plastic tool to avoid scratching. Use a solvent (like isopropyl alcohol) to remove residue.
- Cutting New Seals: If cutting from a sheet, measure accurately and cut slightly larger to ensure a snug fit.
- Installing New Seals: Peel the backing from adhesive foam or apply a light adhesive to felt and press the seal firmly in place. Double-check to ensure all areas are covered without blocking the film door or battery compartment.
Patience and precision are essential for achieving a proper fit, so take your time to ensure a clean, secure installation.
DIY vs. Professional Light Seal Replacement: Pros and Cons:
Replacing light seals yourself has advantages like cost savings and control over materials. DIY replacement can be fulfilling and economical, especially if you’re comfortable handling delicate parts. However, there’s also a risk of damage if you’re not experienced. Professionals have the expertise and tools to install seals precisely, ensuring optimal thickness and durability without risking the camera’s functionality. Choosing between DIY and professional replacement depends on your experience level and whether you want the added reassurance of a professional job.
Maintenance Tips to Extend Light Seal Life on Your Canon F1:
To keep your new seals in great shape, follow these maintenance tips:
- Store Properly: Keep your camera in a cool, dry place away from direct sunlight to prevent premature seal wear.
- Avoid Excessive Humidity: Humidity can break down foam and felt, so consider a moisture-absorbing packet in your camera bag.
- Regular Inspections: Check the seals periodically, even if they’re relatively new, to catch early signs of wear or damage.
- Clean Carefully: When cleaning your camera, avoid harsh chemicals near the seals, as these can degrade the material.
With regular care, light seals can last for years, helping your Canon F1 stay in top shape for all your photography adventures.
This guide will help Canon F1 owners understand and manage their light seal requirements, ensuring optimal performance and preserving photo quality for years to come.
Conclusion:
Maintaining the correct light seal thickness on your Canon F1 is essential for protecting your photos from unwanted light leaks and ensuring your camera performs at its best. By understanding the importance of seal thickness, recognizing when replacement is needed, and choosing the right materials, you can extend your camera’s life and preserve image quality. Whether you decide on a DIY replacement or seek professional help, investing in your camera’s light seals is a small but significant step in keeping it reliable for years to come. With the right care and occasional maintenance, your Canon F1 will continue to capture clear, beautiful images, free from the issues that worn-out seals can cause.


